


Paper Cut Light Box Template: A Comprehensive Guide
Introduction
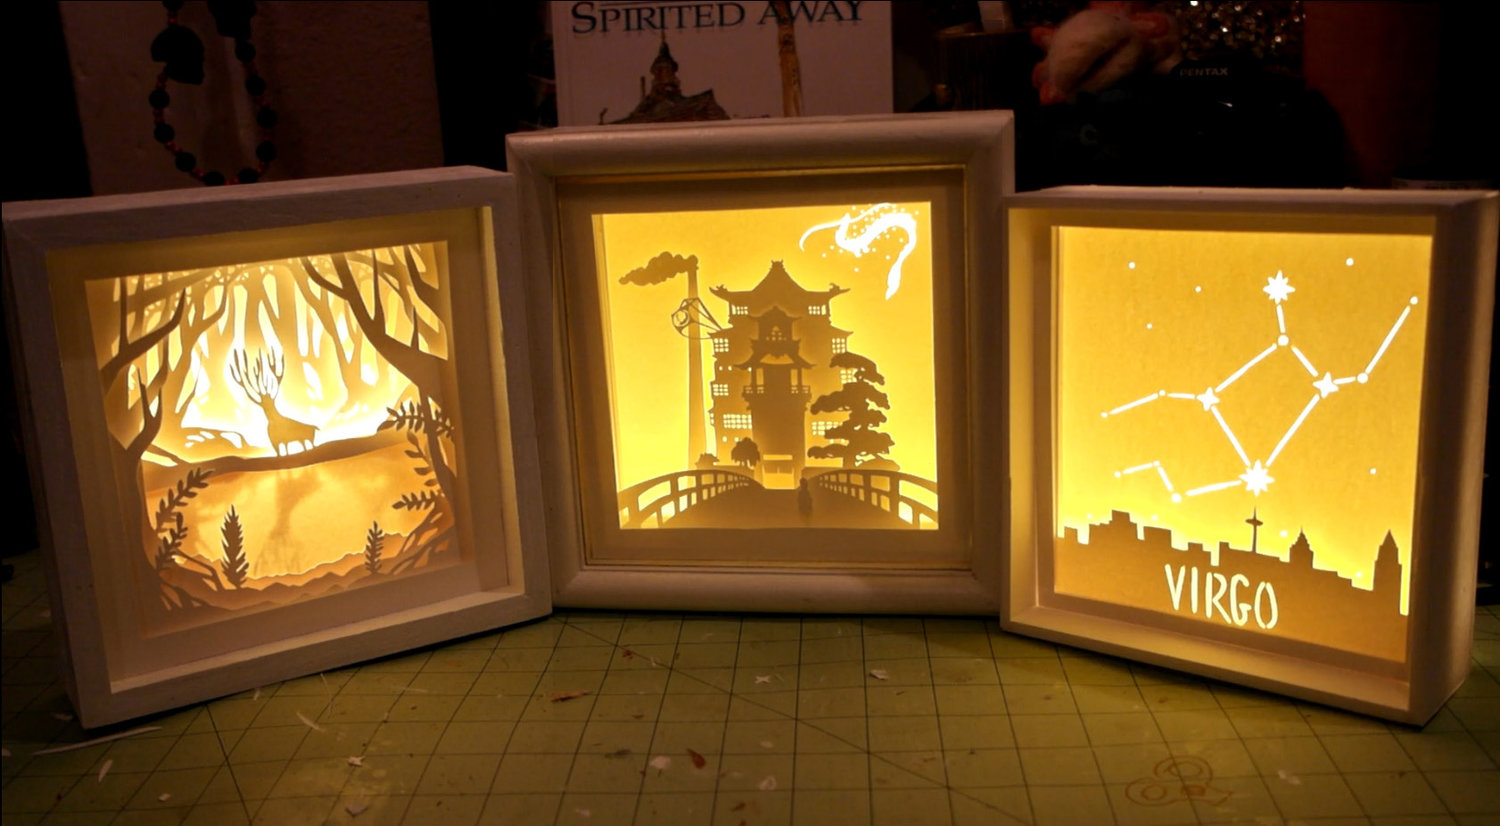
Paper cut light boxes are captivating art pieces that illuminate intricate paper designs with warm, ambient light. With their versatility and affordability, they have become increasingly popular among crafters, artists, and home decorators alike. This comprehensive guide will delve into the world of paper cut light box templates, providing detailed instructions, tips, and inspiration to help you create your own stunning creations.


Table of Content
- 1 Paper Cut Light Box Template: A Comprehensive Guide
- 1.1 Introduction
- 1.2 Section 1: Choosing the Right Template
- 1.3 H2: Factors to Consider
- 1.4 Section 1: Choosing the Right Template
- 1.5 H2: Types of Templates
- 1.6 Section 2: Preparing the Materials
- 1.7 H2: Essential Materials
- 1.8 H2: Preparing the Paper
- 1.9 Section 3: Cutting the Template
- 1.10 H2: Step-by-Step Cutting Instructions
- 1.11 Section 4: Assembling the Light Box
- 1.12 H2: Materials for Assembly
- 1.13 H2: Assembly Instructions
- 1.14 Section 5: Design Ideas and Inspiration
- 1.15 H2: Creative Design Options
- 1.16 H2: Sources of Inspiration
- 1.17 Conclusion
- 1.18 FAQs
Section 1: Choosing the Right Template
- Freehand Templates: Created by hand, offering maximum customization but requiring artistic skill.
- Digital Templates: Available online or in design software, providing precise designs and ease of use.
H2: Factors to Consider
- Complexity: Choose a template that aligns with your skill level and the desired level of detail.
- Size: Consider the size of the light box you want to create and the space available.
- Design: Select a template that resonates with your personal style and decor.


Paper cut light boxes are captivating art pieces that illuminate intricate paper designs with warm, ambient light. With their versatility and affordability, they have become increasingly popular among crafters, artists, and home decorators alike. This comprehensive guide will delve into the world of paper cut light box templates, providing detailed instructions, tips, and inspiration to help you create your own stunning creations.
- Christmas Shadow Box Svg Free Christmas Shadow Box SVG Free: A Festive Way To Decorate Your Home
- Paper Art Shadow Box Paper Art Shadow Box: A Guide To Creating Stunning 3D Paper Sculptures
- Free Svg Shadow Box Files Free SVG Shadow Box Files: A Comprehensive Guide
- Paper Cut Light Box Paper Cut Light Box: A Guide To Creating Stunning Illuminated Art
- Shadow Box 3d Art Shadow Box 3D Art: A Comprehensive Guide To Creating Depth And Dimension
Section 1: Choosing the Right Template
H2: Types of Templates
- Freehand Templates: Created by hand, offering maximum customization but requiring artistic skill.
- Digital Templates: Available online or in design software, providing precise designs and ease of use.
- Paper: Heavyweight drawing paper or cardstock is ideal for durability.
- Craft Knife: Sharp and precise for intricate cuts.
- Cutting Mat: Protects surfaces and provides stability.
- Light Box: Illuminates the template for precise cutting.
- LED Lights: Energy-efficient and long-lasting for illumination.
- Choose a high-quality paper that is thick enough to withstand cutting and resist tearing.
- Secure the paper to the cutting mat using masking tape or clips.
- Ensure the paper is flat and free of wrinkles or creases.
- Trace the Template: Place the template over the paper and trace the design with a pencil or tracing paper.
- Cut the Negative Spaces: Use the craft knife to carefully cut out the negative spaces, removing the areas that will allow light to pass through.
- Cut the Outline: Cut around the outer edges of the design to create the frame of the light box.
- Check for Accuracy: Inspect the cutouts to ensure they are precise and free of any stray lines.
- Frame: Wooden or plastic frame to hold the paper.
- Glass or Plexiglass: Clear material to protect the paper and diffuse the light.
- LED Lights: Mounted inside the frame to illuminate the design.
- Backing: Cardboard or foam board to support the paper.
- Prepare the Frame: Cut the frame to the desired size and attach the glass or plexiglass.
- Insert the Paper: Place the cut paper design inside the frame, aligning it carefully.
- Secure the Backing: Cut a piece of backing to fit inside the frame and place it behind the paper.
- Mount the Lights: Arrange the LED lights inside the frame, ensuring they illuminate the design evenly.
- Multiple Layers: Cut several layers of paper and stack them together to create depth and dimension.
- Colored Paper: Use different colors of paper to add vibrancy and contrast to the design.
- Patterned Paper: Incorporate patterned paper to create intricate and eye-catching designs.
- 3D Elements: Cut out small shapes and glue them to the paper to add a touch of three-dimensionality.
- Online Galleries: Explore websites like Etsy and Pinterest for a wide variety of paper cut light box designs.
- Social Media: Follow artists on Instagram and Facebook for inspiration and tutorials.
- Books and Magazines: Find inspiration in books and magazines dedicated to paper cutting and light boxes.
Section 2: Preparing the Materials

H2: Essential Materials


H2: Preparing the Paper

Section 3: Cutting the Template
H2: Step-by-Step Cutting Instructions
Section 4: Assembling the Light Box
H2: Materials for Assembly
H2: Assembly Instructions
Section 5: Design Ideas and Inspiration
H2: Creative Design Options
H2: Sources of Inspiration
Conclusion
Paper cut light boxes are a versatile and rewarding art form that can transform any space into a captivating oasis. By following the comprehensive instructions and tips outlined in this guide, you can create your own stunning light boxes that will illuminate your home and ignite your creativity. Whether you are a seasoned crafter or a novice, the world of paper cut light boxes offers endless possibilities for self-expression and artistic fulfillment.
FAQs
Q: What type of paper is best for paper cut light boxes?
A: Heavyweight drawing paper or cardstock is recommended for its durability and ability to withstand cutting.
Q: How do I prevent tearing the paper while cutting?
A: Use a sharp craft knife and cut on a stable cutting mat. Secure the paper firmly to the mat using masking tape or clips.
Q: What is the best way to illuminate the design?
A: LED lights are recommended for their energy efficiency, long lifespan, and ability to provide even illumination.
Q: Can I use multiple layers of paper in my design?
A: Yes, multiple layers can add depth and dimension to your light box. Just ensure that the layers are securely glued together.
Q: Where can I find inspiration for paper cut light box designs?
A: Explore online galleries, social media platforms, and books and magazines dedicated to paper cutting and light boxes.


